|
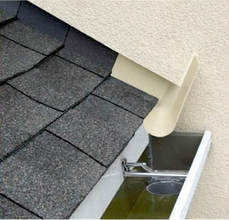
Condensation, also called sweating, forms on building materials when the temperature drops below the dew point, which is the temperature at which droplets of water vapor are forced so closely together that they coalesce into liquid water. Because of their characteristic thermal conductivity, components made of metal are usually the first places where condensation will appear in a building.
Where does condensation typically form?
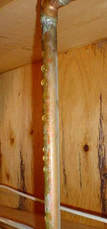
Metals also vary in their thermal conductivity. Thus, they tend to cause water vapor to condense. Inspectors can be aided by a rule of thumb that states that a metal’s ability to transfer heat (and, therefore, create condensation) is roughly equal to that metal’s electrical conductivity. Electricians and some inspectors may know that, of all metals, copper is the second-best conductor of heat and electricity, meaning that it’s more likely to respond to a brief burst of cool water or air than other metals, such as steel or lead. The metal with the greatest conductivity is silver, but it’s far too expensive to be used in ordinary construction.
In summary, condensation will form on cold surfaces if certain precautions are not taken. If left unmitigated, it can lead to moisture-related problems that can affect structural components, as well as the occupants' health.
0 Comments
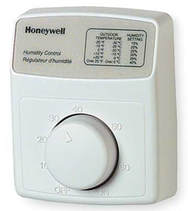
Humidifiers are devices that humidify air so that building occupants are comfortable. Central humidifiers are hard-wired into a house’s plumbing and forced-air heating systems. What is humidity? Humidity refers to the amount of moisture in the air. “Relative humidity” signifies the amount of moisture in the air relative to the maximum amount of water the air can contain before it becomes saturated. This maximum moisture count is related to air temperature in that the hotter the air is, the more moisture it can hold. For instance, if indoor air temperature drops, relative humidity will increase. How do central air humidifiers work? Central air humidifiers are integrated into the forced-air heating system so that they humidify air while it is being heated. The water that is used by the device is pumped automatically into the humidifier from household plumbing, unlike portable humidifiers, which require the user to periodically supply water to the device. Humidifiers are available in various designs, each of which turns liquid water into water vapor, which is then vented into the house at an adjustable rate. Why humidify air? Certain airborne pathogens, such as those that cause the flu, circulate easier in dry air than in moist air. Moist air also seems to soothe irritated, inflamed airways. For someone with a cold and thick nasal secretions, a humidifier can help thin out the secretions and make breathing easier.
Central Humidifier Dangers Humidifiers can cause various diseases. The young, elderly and infirm may be particularly at risk to contamination from airborne pollutants, such as bacteria and fungi. These can grow in humidifiers and get into the air by way of the vapor where it can be breathed in. Some of the more common diseases and pathogens transmitted by humidifiers are:
Other tips that InterNACHI inspectors can pass on to their clients:
In summary, central humidifiers are used to humidify air to make it more comfortable, but they can cause health problems and building damage if they are not properly maintained.
Chimneys are among the heaviest and most structurally vulnerable of all exterior components of a building. Accidents caused by their collapse can lead to death. A collapse can also cause costly structural damage to the building and its surroundings. Inspection, maintenance and preparedness are critical safeguards against chimney collapse.
Chimneys should be inspected for the following defects:
Homeowners should contact their local building departments to obtain required permits before starting any significant construction that may affect the chimney structure and/or its supports.
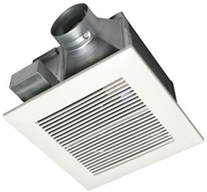
In addition to collapse hazards, leaning chimneys can also make using the fireplace dangerous. Hearth cracks, side cracks in the fireplace, openings around the fireplace, and chimney damage all present the risk that sparks or smoke will enter the living space or building cavities. Check for evidence of fireplace movement. Commercial chimney collapses are rare, but they deserve mention due to the devastation they cause. In one terrible incident in central India, more than 100 workers were killed when a 900-foot (275-meter) tall chimney collapsed on a construction site. One of the worst construction site disasters in recent history, the collapse was blamed on heavy rain. While safety standards are generally more stringent outside of India, commercial chimneys everywhere require inspection. In summary, chimneys should be inspected to prevent deadly, expensive collapses. Bathroom ventilation systems are designed to exhaust odors and moist air to the home's exterior. Typical systems consist of a ceiling fan unit connected to a duct that terminates at the roof. Fan Function The fan may be controlled in one of several ways:
to the fan because of its static charge. Inspectors should comment on dirty fan covers. Ventilation systems should be installed in all bathrooms. This includes bathrooms with windows, since windows will not be opened during the winter in cold climates. Defects The following conditions indicate insufficient bathroom ventilation:
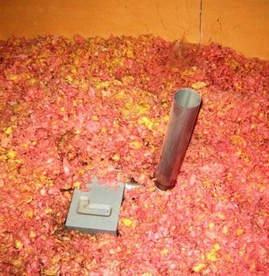
The most common defect related to bathroom ventilation systems is improper termination of the duct. Vents must terminate at the home exterior. The most common improper terminations locations are:
Improperly terminated ventilation systems may appear to work fine from inside the bathroom, so the inspector may have to look in the attic or on the roof. Sometimes, poorly installed ducts will loosen or become disconnected at joints or connections. Ducts that leak or terminate in attics can cause problems from condensation. Warm, moist air will condense on cold attic framing, insulation and other materials. This condition has the potential to cause health and/or decay problems from mold, or damage to building materials, such as drywall. Moisture also reduces the effectiveness of thermal insulation. Mold Perhaps the most serious consequence of an improper ventilation setup is the potential accumulation of mold in attics or crawlspaces. Mold may appear as a fuzzy, thread-like, cobwebby fungus, although it can never be identified with certainty without being lab-tested. Health problems caused by mold are related to high concentrations of spores in indoor air. Spores are like microscopic seeds, released by mold fungi when they reproduce. Every home has mold. Moisture levels of about 20% in materials will cause mold colonies to grow. Inhaling mold spores can cause health problems in those with asthma or allergies, and can cause serious or fatal fungal infections in those with lung disease or compromised immune systems. Mold is impossible to identify visually and must be tested by a lab in order to be confidently labeled. Inspectors should refrain from calling anything “mold” but should refer to anything that appears as mold as a material that “appears to be microbial growth.” Inspectors should include in their report, and in the inspection agreement signed by the client, a disclaimer clearly stating that the General Home Inspection is an inspection for safety and system defects, not a mold inspection. Decay, which is rot, is also caused by fungi. Incipient or early decay cannot be seen. By the time decay becomes visible, affected wood may have lost up to 50% of its strength. In order to grow, mold fungi require the following conditions to be present:
If insufficient levels of any of these requirements exist, all mold growth will stop and fungi will go dormant. Most are difficult to actually kill. Even though mold growth may take place in the attic, mold spores can be sucked into the living areas of a residence by low air pressure. Low air pressure is usually created by the expulsion of household air from exhaust fans in bathrooms, dryers, kitchens and heating equipment.
The following tips are helpful, although not required. Ventilation ducts should:
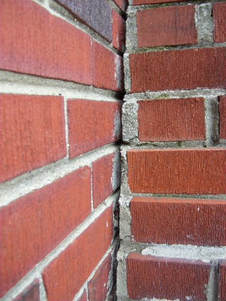
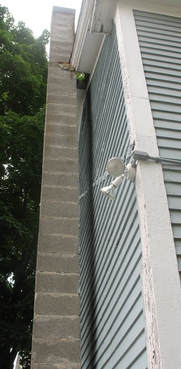
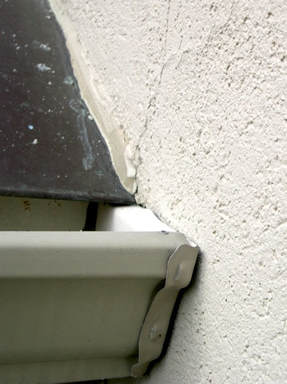
Kickout flashing, also known as diverter flashing, is a special type of flashing that diverts rainwater away from the cladding and into the gutter. When installed properly, they provide excellent protection against the penetration of water into the building envelope.
The kickout was never installed.
The following are locations where kickout flashing is critical:
In summary, kickout flashing should be present and properly installed in order to direct rainwater away from the cladding.
Have you ever woken up in the middle of a winter night, shivering under the blankets and able to see your breath? Or have you ever watched the thermostat creep into the upper 80s during a record-setting heat wave, realizing you haven't heard the air conditioner kick on? If so, your heating or cooling system was on the fritz—and (of course), it happened at the worst possible time. 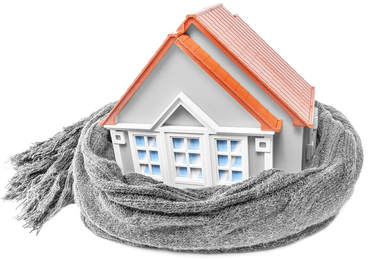 These systems not only fail when you need them the most, but also during the hardest time of the year to get a heating, ventilation and air-conditioning (HVAC) contractor to come by for repairs. Naturally, technicians are at their busiest when these systems are busiest. So, unless you have a relative in the business, the best way to ensure your heating and cooling systems keep working is to maintain them properly. To guard against a future breakdown, have a professional perform periodic maintenance on the systems before the peak seasons begin. Have the heating system serviced in late summer or early fall, and keep in mind that priority scheduling for repeat customers may begin mid-summer. For a central air-conditioning system, arrange to have a pro check it out in the early spring, after temperatures have reached 65° F, depending on when it starts getting hot in your region. A typical maintenance call will involve tightening electrical connections, checking the condition of hoses and belts, lubricating all moving parts, and making sure the controls work properly. For cooling components, the contractor will clean the evaporator coils that remove the heat from the air in your home, as well as the condenser coils that release the collected heat to the outside air. Your tech will also check the fan components, make sure the refrigerant level in the system is correct, inspect ductwork and gas lines, and check for leaks. For heating systems, technicians typically check fuel connections, change the filters, and inspect the system's combustion and heat exchangers. What You Can Do To Keep Your HVAC System Operating!Here are a few maintenance tasks you can perform yourself:
Repair Vs. ReplaceIf your HVAC system does break down, you will be faced with the decision of whether to repair or replace it. Repairs are less expensive, but there are a number of reasons to consider replacing the entire unit.
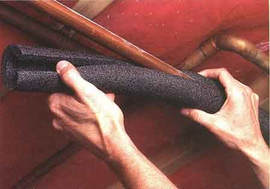
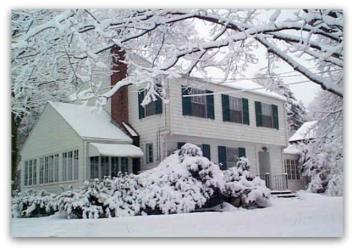
Winterization is the process of preparing a home for the harsh conditions of winter. It is usually performed in the fall before snow and excessive cold have arrived. Winterization protects against damage due to bursting water pipes, and from heat loss due to openings in the building envelope. Inspectors should know how winterization works and be able to pass this information on to their clients
Even during very small ruptures or ruptures that are stopped quickly, water leakage can result in mold and property damage. Broken water pipes can be costly to repair.
Leaks In The Building EnvelopeLeaky window frames, door frames, and electrical outlets can allow warm air to escape into the outdoors.
Insulation
Cooling System Winterizing
Chimneys & Fireplaces Winterizing
Roof Winterizing
Landscape Winterizing
Adequate winterization is especially crucial for homes that are left unoccupied during the winter. This sometimes happens when homeowners who own multiple properties leave one home vacant for months at a time while they occupy their summer homes. Foreclosed homes are sometimes left unoccupied, as well. The heat may be shut off in vacant homes in order to save money. Such homes must be winterized in order to prevent catastrophic building damage. In addition to the information above, InterNACHI advises the following measures to prepare an unoccupied home for the winter:
In summary, home winterization is a collection of preventative measures designed to protect homes against damage caused by cold temperatures. These measures should be performed in the fall, before it gets cold enough for damage to occur. Indoor plumbing is probably the most critical area to consider when preparing a home for winter, although other systems should not be ignored.
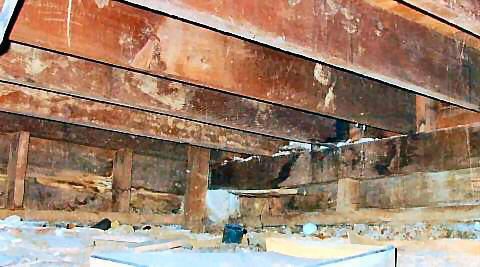
long periods of time. The following are some of the more common dangers discovered in crawlspaces: Mold & Fungus
Pests (wood destroying organism)
Hantavirus
Asbestos
Standing Water or Sewage
Structural Collapse
Improper Wiring
Source of Energy Waste
Moisture intrusion can be the cause of building defects, as well as health ailments for the building's occupants. Inspectors should have at least a basic understanding of how moisture may enter a building, and where problem areas commonly occur.
Some common moisture-related problems include:
How does moisture get into the house? Moisture or water vapor moves into a house in the following ways:
Climate Zones In the northern U.S., moisture vapor problems are driven primarily by high indoor relative humidity levels, combined with low outdoor temperatures during the winter. In the southern U.S. (especially the southeast), the problem is largely driven by high outdoor humidity and low indoor temperatures during summer months. Mixed climates are exposed to both conditions and can experience both types of problems. Humid climates, in general, will be more of a problem than dry climates. Wind-driven rain is the main cause of leaks through the building envelope. Inspectors can check for moisture intrusion in the following areas: Roofs A roof leak may lead to the growth of visible mold colonies in the attic that can grow unnoticed. Roof penetrations increase the likelihood of water leaks due to failed gaskets, sealants and flashing. The number of roof penetrations may be reduced by a variety of technologies and strategies, including:
Plumbing
Utility Room
Attic
Foundations Model building codes typically require damp-proofing of foundation walls. The damp-proofing shall be applied from the top of the footing to the finished grade. Parging of foundation walls should be damp-proofed in one of the following ways:
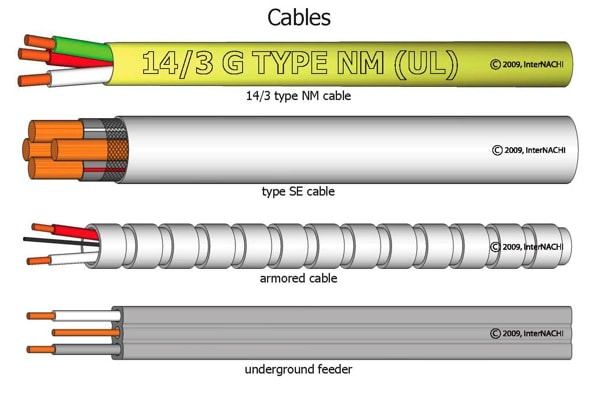
In summary, moisture can enter a building in a number of different ways. High levels of moisture can cause building defects and health ailments. Poorly installed and maintained electrical cables are a common cause of electrical fires in homes. Many older homes contain wiring that is now considered obsolete or dangerous. InterNACHI inspectors should understand the basic distinctions between the different types of cable systems so that they can identify unsafe conditions.
The following NEC regulations apply to Romex conductors:
Note: Some communities have never allowed the use of Romex wiring in residential construction. Armored cable is typically used in these communities. Armored Cables (AC) Armored cable (AC), also known as BX, was developed in the early 1900s by Edwin Greenfield. It was first called “BX” to abbreviate “product B – Experimental,” although AC is far more commonly used today. Like Romex cables, they cannot be used in residences higher than three stories, and the rules for protection and support of AC wiring are essentially the same as the rules for Romex. Unlike Romex, however, AC wiring has a flexible metallic sheathing that allows for extra protection. Some major manufacturers of armored cable are General Cable, AFC Cable Systems, and United Copper Systems.
|
InsideOut Team
This blog is to help people better understand their home inspection. It is filled with great in depth advice. If you'd like a topic covered just send us an email on what you need more information on! Archives
August 2023
Categories
All
|

 RSS Feed
AboutThe best home & commercial building inspection company in Michigan. Serving Southeast Michigan, Northwest Ohio, Northern Michigan and surrounding areas.
|
Address8314 Whiteford Center Rd Ottawa Lake, MI
49267 1354 W Bear Lake Rd NE Kalkaska, MI 49646 |
ConnectSE Michigan: 734-224-0342
N Michigan : 231-714-6880 NW Ohio: 419-215-3856 Office@insideoutinspectionsplus.net M-F: 7AM - 8:30 PM Saturday: 7AM - 8:30 PM Sunday: 7AM - 8:30 PM |
Social Media |
Resources |
© 2023 InsideoutInspections.net. All Rights Reserved.