Home Inspection For SE Michigan, Northwest Ohio, Toledo Ohio
  • Home
  • Services
    • Well Inspections
    • Residential Inspection
    • Commercial Inspection
    • Infared/Thermal Imaging
    • Radon Testing
    • Mold Inspections
    • Septic Inspections
    • Pest Inspections
    • Water Quality Testing
    • Structural Inspections
    • Sewer Scope
    • Manufactured Home Certs
    • Home Binder
  • Areas Served
  • Schedule
  • Reviews
  • Contact
  • Blog

Inspecting Ducted Returns In Your Home!

10/26/2017

0 Comments

 
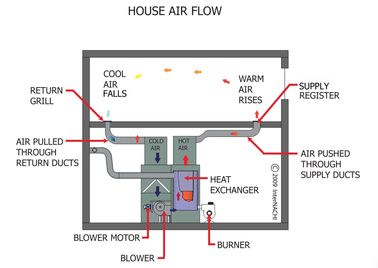
Although inspection of return ducts is not a required step in a professional home inspection, return ducts are a vital component of the HVAC system. Because of this, home inspectors should familiarize themselves with the following key facts and practices in order to perform a superior inspection of the HVAC system.

Home inspectors should take note that in order for central forced-air furnace and air conditioning systems to operate properly, the HVAC distribution system should be designed with adequate supply and return registers that provide conditioned air to all parts of the house and return stale air to the furnace for reconditioning.  Inadequate return air pathways can cause pressure imbalances from room to room, which can create drafts and temperature differences between rooms or floors, leading to complaints about comfort. Pressure imbalances can also cause the furnace and air-conditioning equipment to work harder than necessary. A well-designed return air strategy is critical for the performance of the HVAC system in an energy-efficient house, which may have lower airflow requirements to meet the lower heating and cooling loads. The return air must have a clear path back to the air handler from every room that has a supply outlet, with the exception of bathrooms or kitchens due to the potential for spreading odors through the house.

Each room can be individually ducted to the return side of the air handler; however, installing that much ducting is costly, and there may be space constraints that limit the feasibility of this approach. Utilizing a central return strategy is a simple and effective way to return stale air to the air handler (see Figure 1). When utilizing a central return strategy, one or more return registers should be placed in central hallways or stairwells adjacent to the main living spaces of the house, with at least one return per floor. These central returns should be ducted to the return side of the HVAC air handler, with air-sealed ducts that are insulated if they're located in an unconditioned space (see Figure 2). Building cavities (the space between wall studs or panned floor joists) should not be used as return air pathways; if un-ducted, these spaces are very difficult to air seal. Return air pathways that leak will draw air from unintended places in the house and can lead to undesirable pressure differences. Home inspectors should take note that a fully ducted return system will be easier to air seal and will have better airflow characteristics than building cavities used as return air pathways.

To ensure that stale air is able to return to these central returns from rooms that have closeable doors, such as bedrooms or offices, builders will often rely on door undercuts. Typical door undercuts of 1/2- to 3/4-inch by themselves do not allow adequate return volume, especially when carpet is installed, and they're not appropriate for an energy-efficient house. Door undercuts are not approved in the ACCA (Air Conditioning Contractors of America) Manual D. Other methods for providing an air pathway from closed rooms to central return registers are jump ducts and transfer grilles.

Return ducts are installed by the HVAC contractor. Return duct locations should be indicated on the HVAC design plans, which is something home inspectors can keep in mind. Tasks associated with this installation should be included in the contract for the appropriate trade, depending on the workflow at a specific job site.

How Professionals Install Return Ducts
1. Calculate the amount of return air needed. A target value for return capacity is two times the volume of the total supply air with an airflow velocity within the return of less than 500 feet per minute and the net free area of the grille sized 1.5 times the cross-sectional area of the return duct. ENERGY STAR requires that returns achieve a rater-measured pressure differential of ≤ 3 Pascals (0.012 inch water column) with respect to the main body of the house when bedroom doors are closed and the air handler is operating on the highest design fan speed. A rater-measured pressure differential of ≤5 Pascals (0.020 inch water column) is acceptable for rooms with a design airflow ≥150 cfm. The bedrooms can be pressure-balanced using any combination of transfer grilles, jump ducts, dedicated return ducts, and/or undercut doors.
2. Determine whether to use individual return ducts, one or more central ducts, or central ducts in combination with transfer grills, jump ducts, and/or undercut doors. Consider filter placement when making this decision. With individually ducted returns, the filter will need to be located at the equipment return air inlet. With a centrally located return, the filter can be located at the return grille. This configuration may make it easier for the homeowner to change or clean the furnace filter, if plans called for locating the furnace in a hard to reach location, such as an attic or crawlspace. 
​
  1. Consider the effects of noise when determining the placement of returns. A return duct that has a direct connection to the blower motor could transfer that blower noise to the living room.
  2. Consider size when locating central returns. Central return grilles are much larger than most supply grilles.

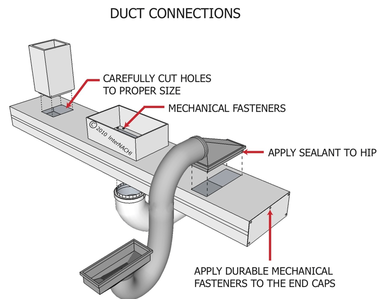
Install return ducts as the supply ducts are installed.
  1. Seal all seams, gaps and holes of the return duct system with mastic.
  2. Seal the return box to the floor, wall or ceiling with mastic, caulk and/or foam.
  3. Do not use building cavities as return air pathways.
Picture
Picture
Summary

HVAC distribution systems should be designed with adequate supply and return registers to provide conditioned air to all parts of the house and return stale air to the furnace for reconditioning. A well-designed return air strategy is critical for the performance of the HVAC system in an energy-efficient house. Home inspectors can familiarize themselves with these key facts and practices in order to better understand each vital component of an HVAC system. This can help in-progress inspections of HVAC systems, as well as during a home energy score evaluation. 
0 Comments

Crawlspace Inspecting 101

10/20/2017

0 Comments

 
Crawlspaces are host to a large number of conditions that may harm the house or inspectors. Never enter a crawlspace without proper personal protective equipment.
 Crawlspaces are notorious for the nasty discoveries made there by inspectors, and it isn’t hard to figure out why; for one thing, their cool, dark environment attracts 
undesirable pests and can promote dangerous conditions. And since crawlspaces are mostly unmonitored, hazards can breed there unchecked for 
Picture
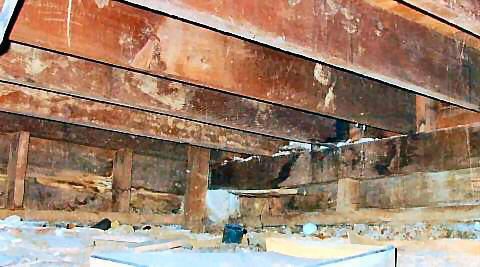
long periods of time. The following are some of the more common dangers discovered in crawlspaces:

Mold & Fungus

  • Just like pests, mold and fungus can grow rapidly in crawlspaces. They are both a health concern as well as a cause of wood decay, which can require a costly repair. Airborne mold spores can potentially enter the living space from the crawlspace. Molds produce allergens (substances that can cause allergic reactions), irritants and, in some cases, potentially toxic substances called mycotoxins. Inhaling or touching mold or mold spores may cause allergic reactions in sensitive individuals. Allergic responses include hay fever-type symptoms, such as sneezing, runny nose, red eyes, and skin rash (dermatitis). Homes infected with molds and fungus are also much more difficult to sell, often requiring costly remediation prior to closing the deal.

Pests (wood destroying organism)

  • ​Dirt crawlspaces provide the environment that is enjoyed by ants, termites, and various other pests. Termites cannot survive long outside of their mud tubes, which you may see on foundation walls and piers. Carpenter ants should be plainly obvious as well, and both of theses pests can cause structural damage. Also bear in mind that where there are pests, there may also be pesticides, perhaps improperly applied, which is one reason why you should not enter crawlspaces without personal protective equipment. Snakes, spiders, bees and scorpions may also be lingering in the crawlspace, and while they pose little structural danger to the house, they certainly can harm you! Rapid retreat there can be difficult, so be cognizant of escape paths.

Hantavirus

  • Crawlspaces are perhaps the most likely sites in houses where hantavirus may be found. This is partly due to the fact that rodents that carry the pathogen are attracted to areas that are undisturbed by humans. Also, crawlspaces are generally dark places that lack ultraviolet (UV) radiation, which can rapidly inactivate the virus. Exposure to hantavirus may lead to Hantavirus Cardiopulmonary Syndrome (HCS), characterized by headaches, fever, difficulty breathing and, often, death. There is no known cure, vaccine or treatment that specifically targets HCS. However, if the symptoms are recognized early, patients may benefit from oxygen therapy.

Asbestos

  • ​Do not disturb asbestos! The microscopic fibers that cause illness become airborne when the insulation is handled or disturbed, and if it appears to be in good shape, it might not be a problem at all. Prolonged exposure to asbestos insulation can cause mesothelioma, which is a cancer of the lining of the chest and the abdominal cavity, as well as asbestosis, in which the lungs become scarred with fibrous tissue.

Standing Water or Sewage

  • ​Dirt crawlspaces are susceptible to water seepage, which can create a host of problems, such as microbial growth, odors, damage to stored belongings, and risk of electrical shock.

Structural Collapse

  •  If the home itself is unstable, it might be dangerous to enter its crawlspace. It is easy to become pinned, trapped or even crushed by unstable crawlspaces. Make sure someone knows that you are inspecting the crawlspace before you enter it.

Improper Wiring

  • Watch for loose wiring, open junction boxes, or wiring that has become loose and fallen to the floor. 

Source of Energy Waste

  • ​Traditionally, crawlspaces have been vented to prevent problems with moisture, and most building codes require vents to aid in removing moisture from the crawlspace. However, many building professionals now recognize that ventilated crawlspaces allow a great deal of heat loss in the winter and moisture intrusion in the summer from moist air.
0 Comments

Moisture Intrusion

10/10/2017

0 Comments

 
Moisture intrusion can be the cause of building defects, as well as health ailments for the building's occupants. Inspectors should have at least a basic understanding of how moisture may enter a building, and where problem areas commonly occur.

 
Some common moisture-related problems include:
  • structural wood decay; 
  • high indoor humidity and resulting condensation;
  • expansive soil, which may crack the foundation through changes in volume, or softened soil, which may lose its ability to support an overlying structure;
  • undermined foundations;
  • metal corrosion;
  • ice dams; and
  • mold growth.  Mold can only grow in the presence of high levels of moisture. People who suffer from the following conditions can be seriously (even fatally) harmed if exposed to elevated levels of airborne mold spores:
    • asthma;
    • allergies;
    • lung disease; and/or
    • compromised immune systems.​
Note:  People who do not suffer from these ailments may still be harmed by elevated levels of airborne mold spores.

How does moisture get into the house?

Moisture or water vapor moves into a house in the following ways:
  • air infiltration. Air movement accounts for more than 98% of all water vapor movement in building cavities. Air naturally moves from high-pressure areas to lower ones by the easiest path possible, such as a hole or crack in the building envelope. Moisture transfer by air currents is very fast (in the range of several hundred cubic feet of air per minute). Replacement air will infiltrate through the building envelope unless unintended air paths are carefully and permanently sealed;
  • by diffusion through building material. Most building materials slow moisture diffusion, to a large degree, although they never stop it completely;
  • leaks from roof;
  • plumbing leaks; 
  • flooding, which can be caused by seepage from runoff or rising groundwater; it may be seasonal or catastrophic; and
  • human activities, including bathing, cooking, dishwashing and washing clothes. Indoor plants, too, may be a significant source of high levels of humidity.

Climate Zones
 
In the northern U.S., moisture vapor problems are driven primarily by high indoor relative humidity levels, combined with low outdoor temperatures during the winter. In the southern U.S. (especially the southeast), the problem is largely driven by high outdoor humidity and low indoor temperatures during summer months. Mixed climates are exposed to both conditions and can experience both types of problems. Humid climates, in general, will be more of a problem than dry climates. Wind-driven rain is the main cause of leaks through the building envelope.
 Inspectors can check for moisture intrusion in the following areas:

Roofs
A roof leak may lead to the growth of visible mold colonies in the attic that can grow unnoticed. Roof penetrations increase the likelihood of water leaks due to failed gaskets, sealants and flashing. The number of roof penetrations may be reduced by a variety of technologies and strategies, including: 
  • consolidation of vent stacks below the roof;
  • exhaust fan caps routed through walls instead of the roof;
  • high-efficiency combustion appliances, which can be sidewall-vented;
  • electrically powered HVAC equipment and hot water heaters that do not require flue; and
  • adequate flashing. Oftentimes, inspectors discover missing, incorrectly installed or corroded flashing pipes.

​Plumbing
  • Distribution pipes and plumbing fixtures can be the source of large amounts of moisture intrusion. If the wall is moist and/or discolored, then moisture damage is already in progress. Most plumbing is hidden in the walls, so serious problems can begin unnoticed.
  • One of the most important means of moisture management in the bathroom is the exhaust fan. A non-functioning exhaust fan overloads the bathroom with damp air. If the exhaust fan doesn’t turn on automatically when the bathroom is in use, consider recommending switching the wiring or switch. The lack of an exhaust fan should be called out in the inspection report. The fan should vent into the exterior, not into the attic.
  • The bathroom sink, in particular, is a common source of moisture intrusion and damage. Although overflow drains can prevent the spillage of water onto the floor, they can become corroded and allow water to enter the cabinet.  
  • Use a moisture meter to check for elevated moisture levels in the sub-floor around the toilet and tub.
  • Bathroom windows need to perform properly in a wide range of humidity and temperature conditions. Check to see if there are any obvious breaks in the weatherstripping and seals. Are there are stains or flaking on the painted surfaces?
  • Check showers and bathtubs. Is the caulking is cracked, stiff or loose in spots? Are there cracked tiles or missing grout that may channel water to vulnerable areas? If some water remains in the bathtub after draining, it may be a warning sign of possible structural weakening and settlement in the floor beneath the tub.

Utility Room
  • The water heater tank should be clean and rust-free.
  • The area around the water softener tank should be clean and dry.
  • Check that all through-the-wall penetrations for fuel lines, ducts, and electrical systems of heating system are well-sealed. All ducts should be clean and dust-free. Inspect the air supply registers in the house for dust accumulation.   
  • Filters, supply lines, exterior wall penetrations, vents, ductwork and drainage of the cooling system must all be in good working order to avoid moisture problems.  

Attic
  • Look for stains or discolorations at all roof penetrations. Chimneys, plumbing vents and skylight wells are common places where moisture may pass through the roof. Any such locations must be inspected for wetness, a musty smell and/or visible signs of mold.
  • Are there areas of the insulation that appear unusually thin?
  • Rust or corrosion around recessed lights are signs of a potential electrical hazard.

Foundations

Model building codes typically require damp-proofing of foundation walls. The damp-proofing shall be applied from the top of the footing to the finished grade. Parging of foundation walls should be damp-proofed in one of the following ways:
  • bituminous coating;
  • 3 pounds per square yard of acrylic modified cement;
  • 1/8-inch coat of surface-bonding cement; or
  • any material permitted for water-proofing.

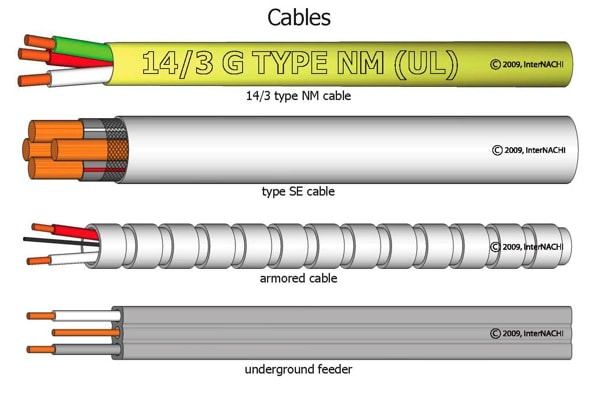
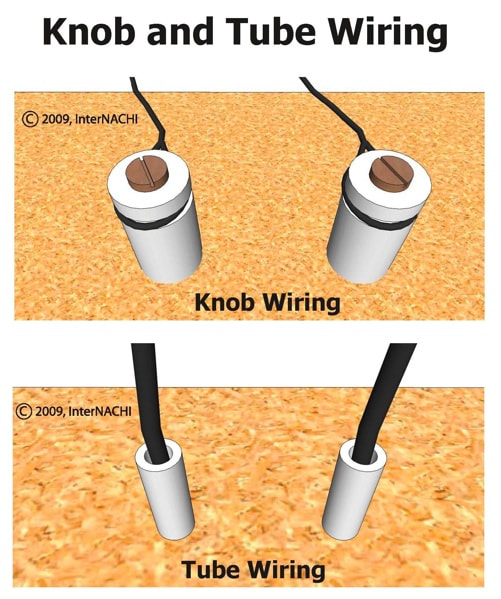
In summary, moisture can enter a building in a number of different ways. High levels of moisture can cause building defects and health ailments. 
0 Comments

Common Electrical Conductors During A Residential Home Inspection

10/6/2017

0 Comments

 
Poorly installed and maintained electrical cables are a common cause of electrical fires in homes. Many older homes contain wiring that is now considered obsolete or dangerous. InterNACHI inspectors should understand the basic distinctions between the different types of cable systems so that they can identify unsafe conditions.

Romex Cables

Romex is the trade name for a type of electrical conductor with non-metallic sheathing that is commonly used as residential branch wiring. The following are a few basic facts about Romex wiring:
  • Romex™ is a common type of residential wiring that is categorized by the National Electrical Code (NEC) as underground feeder (UF) or non-metallic sheathed cable (NM and NMC).
Picture
  • NM and NMC conductors are composed of two or more insulated conductors contained in a non-metallic sheath. The coating on NMC cable is non-conducting, flame-resistant and moisture-resistant. Unlike other cables commonly found in homes, they are permitted in damp environments, such as basements. 

  • Underground feeder conductors appear similar to NM and NMC cables except that UF cables contain a solid plastic core and cannot be “rolled” between fingers.

 
The following NEC regulations apply to Romex conductors:
  • They are not permitted in residential construction higher than three stories, or in any commercial construction. 

  • They must be protected, secured and clamped to device boxes, junction boxes and fixtures. 

  • Support devices that may damage the cables, such as bent nails and overdriven staples, are not permitted. 

  • NM and NMC cables should be secured at intervals that do not exceed 4½ feet, and they should be secured within 12 inches of junction boxes and panels to which they are attached. Cables that do not comply with this rule can sag and are vulnerable to damage. 

  • They are intended as permanent wiring in homes and should not be used as a substitute for appliance wiring or extension cords.

Note:  Some communities have never allowed the use of Romex wiring in residential construction. Armored cable is typically used in these communities. 

Armored Cables (AC)
 
Armored cable (AC), also known as BX, was developed in the early 1900s by Edwin Greenfield. It was first called “BX” to abbreviate “product B – Experimental,” although AC is far more commonly used today. Like Romex cables, they cannot be used in residences higher than three stories, and the rules for protection and support of AC wiring are essentially the same as the rules for Romex. Unlike Romex, however, AC wiring has a flexible metallic sheathing that allows for extra protection. Some major manufacturers of armored cable are General Cable, AFC Cable Systems, and United Copper Systems.

Service Entry (SE) Conductors

Knob & Tube Wiring

These cables begin at the splice and enter the meter. They are not permitted inside homes, with the exception of “style R” SE cable that can serve as interior wiring in branch circuits for ovens and clothes dryers. Style R cables should be clearly marked on their jacket surfaces.
 
Knob-and-Tube (KT) Wiring
 
Most houses constructed prior to World War II were wired using the knob-and-tube method, a system that is now obsolete. They are more difficult to improve than modern wiring systems and are a fire hazard. Knob-and-tube wiring is supported with ceramic knobs, and runs intermittently though ceramic tubes beneath framing and at locations where the wires intersect. Whenever an inspector encounters knob-and-tube wiring, s/he should identify it as a defect and recommend that a qualified electrician evaluate the system. The following are a few reasons why inspectors should be wary of this old wiring system:
Picture
​
  • The dissipated heat from knob-and-tube wiring can pose a fire hazard if the wires are enveloped in building insulation. A possible exception is fiberglass insulation, which is fire-resistant, although even this type of insulation should not cover knob-and-tube wiring. The homeowner or an electrician should carefully remove any insulation that is found surrounding KT wires. 

  • Knob-and-tube wiring is more vulnerable to damage than modern wiring because it is insulated with fiber materials and varnish, which can become brittle. 

  • Some insurance companies refuse to write fire insurance for houses with this type of wiring, although this may be remedied if an electrician can verify that the system is safe. 

  • Disregarding any inherent inadequacies, existing KT cable systems are likely to be unsafe because they are almost guaranteed to be at least 50 years old.
In summary, inspectors should understand the different types of conductors that are commonly found in homes. 
0 Comments

    InsideOut Team   

    This blog is to help people better understand their home inspection. It is filled with great in depth advice. If you'd like a topic covered just send us an email on what you need more information on!

    Archives

    November 2020
    October 2020
    March 2020
    November 2018
    April 2018
    March 2018
    February 2018
    January 2018
    December 2017
    November 2017
    October 2017
    September 2017
    July 2017
    May 2017
    April 2017
    March 2017
    February 2017
    January 2017
    April 2014

    Categories

    All
    Appliances
    Home Inspection
    Household Features
    Inspection Reasons

    RSS Feed

    Newsletter Sign Up

Submit

InsideOut
Contact
Information

SE MI: 734.224.0342
N MI:
231-714-6880
OH: 419.215.3856

8314 Whiteford Center Rd
Ottawa Lake, MI 
49267

1354 W Bear Lake Rd NE
Kalkaska, MI
​49646
​
Fax: 
734-224-0241

What We Do

Residential Home Inspections
Commercial Inspections
Radon Testing
Water Quality Testing
Septic/Leach Field Inspections
Sewer Scope Inspections
Well Inspections
Pest Inspections
Structural Inspections
Manufactured Home Certifications
Mold Testing
Infrared Inspections
Home Binder

Social Media

© 2021 InsideoutInspections.net. All Rights Reserved.
  • Home
  • Services
    • Well Inspections
    • Residential Inspection
    • Commercial Inspection
    • Infared/Thermal Imaging
    • Radon Testing
    • Mold Inspections
    • Septic Inspections
    • Pest Inspections
    • Water Quality Testing
    • Structural Inspections
    • Sewer Scope
    • Manufactured Home Certs
    • Home Binder
  • Areas Served
  • Schedule
  • Reviews
  • Contact
  • Blog