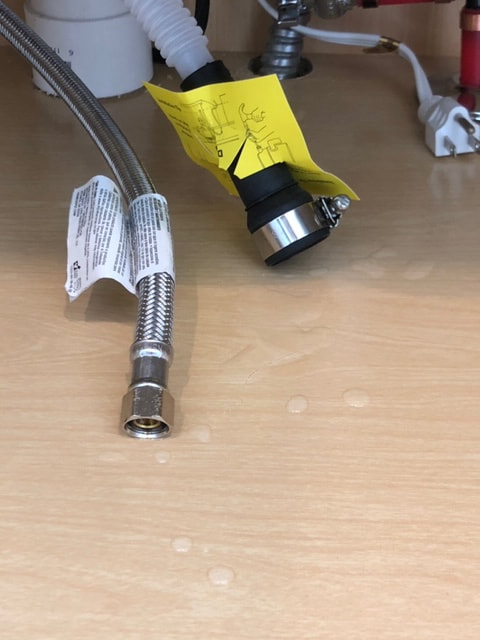
Home Inspection For SE Michigan, Northwest Ohio, Toledo Ohio
  • Home
  • Services
    • Well Inspections
    • Residential Inspection
    • Commercial Inspection
    • Infared/Thermal Imaging
    • Radon Testing
    • Mold Inspections
    • Septic Inspections
    • Pest Inspections
    • Water Quality Testing
    • Structural Inspections
    • Sewer Scope
    • Manufactured Home Certs
    • Home Binder
  • Areas Served
  • Schedule
  • Sample Report
  • Reviews
  • Contact
  • Blog

Invest in Quality

11/24/2020

0 Comments


Why Hire InsideOut Inspections Plus?

​There is an unspoken understanding that something of quality is worth a larger price tag. Have you ever heard of the saying, “You get what you pay for.”? If quality and knowledge is something you are looking for in a home inspection, let us explain why you should look no further than InsideOut Inspections Plus.
What are you purchasing when you choose to work with InsideOut?

Knowledge & Experience

Every InsideOut Inspector is trained, licensed, and insured. We understand that your home is often one of the most important investments made in your lifetime and we are continually learning to ensure we are providing you the most accurate information possible. Our Company was founded on the “coattails” of a successful 45+ year construction business. Our niche understanding of construction combined with our continuing education makes our inspections incomparable to others in the industry.

Peace of Mind

Whether you are a seasoned investor or a first-time homebuyer, our inspectors will give you the highest quality inspection possible. We encourage our clients to be present during the inspection so we can walk through the entire home, explaining our findings, and teaching them about their perspective home. When a client cannot attend their inspection, they are protected by an extremely thorough and detailed, electronic inspection report and the opportunity to call and speak with their inspectors and ask any questions.

Attention to Detail

Our company sends multiple inspectors to each property to ensure efficiency and the utmost attention to detail. We are trained to find abnormalities and defects that may be hard to identify by the untrained eye. For reference, here’s an idea of what is covered in a Standard Home Inspection with our team:
  • Foundation
  • Roof
  • Furnace
  • Air Conditioning
  • Water Heater
  • Electrical Panel
  • All Faucets
  • All Drains
  • Toilets
  • Bathtubs
  • Showers
  • All Appliances (If included in Sale, Except Washer & Dryer)
  • All Windows
  • All Doors
  • All Outlets
  • All Switches
  • Inspect Attic/Crawlspace (If Accessible)

One-Stop-Shop

We understand that purchasing a home can be overwhelming and requires a lot of work to coordinate everything. Our team works hard to provide all of our ancillary services IN-HOUSE, to ensure a streamlined inspection. There is no need to coordinate multiple vendors and worry about everyone’s schedules. Our office staff works together with all clients and realtors involved in the transaction to do all the heavy lifting of coordinating schedules for you. Services provided by our team include:
  • Home Inspections
  • Investment Inspections
  • Septic Inspections
  • Sewer Scopes
  • Radon Testing
  • Air Quality Testing/Mold
  • Potable Water Testing
  • VA Water/Pest Inspections
  • Well Inspections
  • Infrared Thermography
  • Termite/WDO Inspections
  • Swimming Pool Inspections
  • Structural Certifications
We promise that working with Inside Out Inspections Plus as a client or Realtor, will change your expectations about home inspections and the standard of care you should receive. With 10 inspectors on staff, we can cater to short contingency periods and provide electronic reports within 24 hours. The quality we provide in an inspection is valued well above the prices we charge. We understand the importance of educating our clients and want to make sure that knowledge is accessible to all. Our prices are very competitive and discounted for more ancillary services being included. Every home is different, so we customize our pricing to fit the needs of the specific property. Don't just take our word for it, take a look at our 500+ Google reviews & our 200% Guarantee.

InsideOut Inspections Plus assures that you will get
​MORE than you paid for, when hiring us. 
​

Picture
0 Comments

Counter Tops

11/5/2020

0 Comments

 
 Let’s talk counter tops.
One of the biggest selling points for a home tends to be the kitchen. Kitchens can run up a very high bill when remodeling and most do not have the extra funds to put towards a full remodel after shelling out the money to purchase a new home. If you are thinking about replacing countertops do your research first! Find out what’s in style, the cost, and care.
 
We chose a few popular countertop styles and researched the durability, care, and price for each one to help with your decision if considering replacing counters. You will find that Quartz prices and ratings are almost apples to apples. The only true difference between the two materials is man-made material vs natural. Think of Quartz as a lab created diamond and Granite a genuine diamond without the significant price difference.
 
Quartz
Consumer Reports Rated 84
Man-Made
Price: Ranges from $50-90 per square foot + installation costs
Stains: 4/5
Cutting: 5/5
Heat: 5/5
Abrasion: 2/5
Cleaning: Regular cleaning should be done with mild soap and a soft cloth. Quartz countertops are non-porous which makes them resistant to bacteria and stains however, bleach can damage the surface or cause permanent discoloration.
 
Granite
Consumer Reports Rated 81
Natural Stone
Price: $50-90 per square foot + installation costs
Stains: 4/5
Cutting: 5/5
Heat: 5/5
Abrasion: 5/5
Impact: 2/5
Cleaning: Warm soapy water and rinse thoroughly or use a 50:50 solution of isopropyl alcohol and water. Windex, bleach, vinegar, or any other acidic substances will dull the granite and weaken the sealant.
 
Concrete
Consumer Reports Rated 40
Price: $25-75 per square foot + installation
Stains: 5/5
Cutting: 1/5
Heat: 2/5
Abrasion: 3/5
Impact: 1/5
Cleaning: Concrete is naturally porous and should always be sealed to protect from scratches, stains, and absorption. Cleaning with regular soap and water should be sufficient and nothing more abrasive than a dish sponge is needed. Penetrating Sealer preferred over topical sealer.
 
Butcher Block (Varnished)
Consumer Reports Rated 37
Price: $20-60 per square foot + installation
Stains: 5/5
Cutting: 1/5
Heat: 1/5
Abrasion: 1/5
Impact: 1/5
Cleaning: Spray white vinegar on the surface of wood counters and let it sit for several minutes. Rinse off with clean sponge or damp rag. 

Keep these things in mind when designing your Pinterest-worthy Kitchens!
0 Comments

New Doesn't Mean Perfect

10/27/2020

0 Comments


Why You Need an Inspection on New Construction Homes. 

Purchasing a new construction home comes with a lot of advantages that are usually worth the higher price tag to a buyer. Unfortunately, there tends to be a misconception surrounding new construction homes and whether or not they need an inspection. While new construction homes do tend to have fewer issues than older homes, this does not guarantee that a home is without flaws or safety defects. Just like having a research paper peer-reviewed, there are always errors that come to light with a fresh set of eyes. 

Small Issues Add-Up

One of the biggest issues in new construction homes is a contractor's use of sub-contractors. When hiring multiple outside contractors to work on different components of the home, some of the smaller items could be looked over, rushed, or forgotten all-together. ​For instance, all of the photos below were taken at an inspection of a new construction home. If a homeowner found all of these issues after moving into their new home and didn't obtain a home warranty, the repairs alone could cost upwards of $1,000. 

Some of these specific issues are small cosmetic mistakes that won't cause much damage however, left untreated the issues with the fascia and loose siding could lead to excess water damage over time and cause thousands of dollars in repairs.
Ridge Vent Improperly secured.

Ancillary Services

If an builder does include a 3rd party quality inspection in the purchase price of your home, looking into additional ancillary inspections could also protect you and your investment in the long run. For instance, we inspected a new construction home recently and our client decided to add on a sewer scope inspection. At some point during the build of their new home, someone crushed their sewer line. Sewer line replacement can cost anywhere from $6,000-$12,000 and in most cases, is not covered under home warranties or common homeowners insurance policies. 

Radon is another Inspection that should still be purchased regardless of the age of a home. Radon is a Radioactive gas that comes up from the ground and can enter a house in many different ways. Radon is the second leading cause of lung cancer in the United States and should be tested for in order to install a mitigation system if needed. Radon does not discriminate between new and old homes.
​
This blog is in no way meant to tear down builders or their work however, it is meant to equip clients and their realtors with more information. 

​When purchasing any home, new or used, we will look out for the best interest of our clients, always!

0 Comments

Septic System Care

10/13/2020

0 Comments

 
Picture
Have you used, or been told to use RID-X for septic maintenance? 

Additives like RID-X or yeast can actually cause you more money and headache than not using anything. RID-X contains much stronger enzymes than the natural bacteria that is found in a healthy septic system. Breaking down solids at a much more rapid rate actually allows them to travel out to your drain field. This will lead to your drain field becoming clogged and potentially even needing to be replaced, and the average septic system replacement cost could set you back anywhere from $8,000 - $25,000!

How can you maintain a healthy septic system?
  • Avoid adding harsh chemicals like bleach, antifreeze, and pesticides to your system that could destroy the natural bacteria
  • Never flush inorganic materials like dental floss, feminine hygiene products, kitty litter, cigarette butts, or paper towels
  • Tanks should be pumped, on average, every 3 years depending on the size of the tank and the home's water usage
  • Get a septic inspection to ensure your system is working correctly and there are no clogs or broken pipes leading to your drain field

Be aware of everything you are putting down your sinks and NEVER treat your toilets or sinks like
a garbage can.

0 Comments

10 Ways to Prepare Your Home for Inspection

3/25/2020

1 Comment


Did You Know There Are Different Types of Home Inspections?

During a real estate transaction you will most likely have your home inspected if you are selling. 
There are a few different ways sellers can approach the inspection process. 
  1. Pre-Inspections can be done prior to listing your home. This will give you an idea of what could be flagged later on in the transaction and give you a chance to fix any issues before even listing the home. 
  2. Most commonly, buyers will submit an offer on your home stating it is "contingent upon home inspection". This would mean an inspection would be completed on your home after an accepted offer, but before moving forward any further in the process. 
  3. You could list your home for sale "as is". This option is usually sold for a fair cash price and could be well below the market value. This option really only makes sense in investment properties.

Move-In Certified Inspections


InsideOut offers Pre-Inspection certifications and they are a huge selling point for any listing. If you know you are entering into a hot market and want your home to move quickly, this option will absolutely help. When you hire InsideOut for a pre-inspection we will come out and preform and inspection just as we would if we were hired by the buyer. We will provide you with a very detailed report and make sure to flag and health and safety issues that could be a deal-breaker when selling your home. After issuing you the completed inspection report InsideOut will return to the residence to inspect that any issues that were flagged during our initial inspection were corrected. Once everything has been completed we will put a Certified Pre-Inspection sign in your front yard right next to your for sale sign. 

Buyer Purchased Home Inspection


If your buyer chooses us for their home inspection they become our customer however, that does not mean that we are not on the same team. We compiled a list of 10 ways that you as the seller can help us and yourselves when entering into the inspection period on your home.  These common items are quick/easy fixes that can allow our time at your home to be as quick and efficient as possible. Taking these 10 steps will also allow provide less opportunity for items to be flagged in your inspection. Please find the printable 10 step form attached below! 

Contact us to learn about all of the inspection services we offer
Call Us
Email Us
10_steps_inspection.2020.pdf
File Size: 477 kb
File Type: pdf
Download File

1 Comment

How Basement Supports Impact Floors Above:  Adjustable Steel Columns

11/7/2018

0 Comments

 
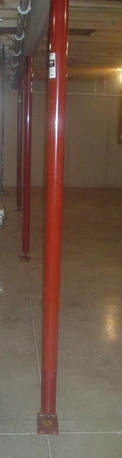
If you have a basement, or a crawl space, you probably have adjustable steel columns, also known as screw jacks and beam jacks.  These are hollow steel posts designed to provide structural support. An attached threaded adjustment mechanism is used to adjust the height of the post.  Adjustments can properly distribute support to the floors above, to prevent out of level conditions that might cause structural damage.  A professional home inspector can determine if these appear to be properly positioned and adjusted, or may suggest consulting a Structural Engineer.
​A few facts about adjustable steel columns:
  • They are usually found in the basement.  In some places, these are called lally columns, but this term can also apply to columns that are concrete-filled and non-adjustable.
  • Adjustable steel columns can be multi-part assemblies, sometimes called telescopic steel columns, or they can also be single-piece columns.
Defects that are often found in adjustable steel columns:
  • The 2012 International Residential Code (IRC), Section R407.3, columns (including adjustable steel columns) says... Adjustable steel columns "shall not be less than 3-inch diameter standard pipe." 
It is possible that a 2½-inch post may be able to support the load above it. However, supports smaller than 3 inches in diameter would violate the IRC even if not necessarily defective. In some cases, a 4-inch diameter post could buckle if the load exceeds the structural capacity of the post - even if not defective.  Structural engineers -- not inspectors -- are the authority on whether adjustable steel posts are of adequate size. But a professional home inspector can render an opinion as to when to consult a  Structural Engineer.
Picture
Other Possible Defects In Structural Supports:
  • Non Compliant Paint Allowing Rust To Form:  According to the IRC Section R407.2, All adjustable steel columns should be protected by rust-inhibitive paint.  It says, specifically, "All surfaces (inside and outside) of steel columns shall be given a shop coat of rust-inhibitive paint, except for corrosion-resistant steel and steel treated with coatings to provide corrosion resistance."   Inspectors will not be able to identify paint as rust-inhibitive, but may be able to observe the earliest stage of rust beginning to form and recommend further attention.  In dry climates where rust is not as much of a problem, rust-inhibitive paint may not be necessary. Visible signs of rust constitute a potential defect. Advanced rust will weaken the post and could cause structural collapse and extensive damage.
  • The post is not straight. The post should not bend anywhere along it's length or especially at its mid-point. Bent Posts indicate that the column cannot bear the weight of the house.  The maximum load is affected by many factors, such as the height and diameter of the post. 
  • The column is not connected to the floor. An inspector can determine whether a connection between the post and the floor exists as long as this connection has not been visually obscured.
  • The column is not connected to the beam. To provide proper support, the post should connect to the beam above.  This connection provides additional resistance against lateral displacement.
  • Too much extension:  If more than 3 inches of the screw thread are exposed the post may be overextended and thus have it's load bearing capacity reduced.
  • There are cracks in upstairs walls. If a post is not properly adjusted, then cracks may appear in walls.  This would suggest a failure of the columns. 
0 Comments

Attic Pull-Down Ladders

4/24/2018

0 Comments

 
Attic pull-down ladders, also called attic pull-down stairways, are collapsible ladders that are permanently attached to the attic floor. Occupants can use these ladders to access their attics without being required to carry a portable ladder.
Common Defects
​

 Homeowners, not professional carpenters, usually install attic pull-down ladders. Evidence of this distinction can be observed in consistently shoddy and dangerous work that rarely meets safety standards. Some of the more common defective conditions observed by inspectors include:
  • cut bottom cord of structural truss. Often, homeowners will cut through a structural member in the field while installing a pull-down ladder, unknowingly weakening the structure. Structural members should not be modified in the field without an engineer’s approval;
  • fastened with improper nails or screws. Homeowners often use drywall or deck screws rather than the standard 16d penny nails or ¼” x 3” lag screws. Nails and screws that are intended for other purposes may have reduced shear strength and they may not support pull-down ladders;​
  • fastened with an insufficient number of nails or screws. Manufacturers provide a certain number of nails with instructions that they all be used, and they probably do this for a good reason. Inspectors should be wary of “place nail here” notices that are nowhere near any nails;
  • lack of insulation. Hatches in many houses (especially older ones) are not likely to be weather-stripped and/or insulated. An uninsulated attic hatch allows air from the attic to flow freely into the home, which may cause the heating or cooling system to run overtime. An attic hatch cover box can be installed to increase energy savings;
Picture
  • loose mounting bolts. This condition is more often caused by age rather than installation, although improper installation will hasten the loosening process;
  • attic pull-down ladders are cut too short. Stairs should reach the floor; 
  • attic pull-down ladders are cut too long. This causes pressure at the folding hinge, which can cause breakage;
  • improper or missing fasteners;
  • compromised fire barrier when installed in the garage;
  • attic ladder frame is not properly secured to the ceiling opening;
  • closed ladder is covered with debris, such as blown insulation or roofing material shed during roof work. Inspectors can place a sheet on the floor beneath the ladder to catch whatever debris may fall onto the floor; and
  • cracked steps. This defect is a problem with wooden ladders. 
  • In sliding pull-down ladders, there is a potential for the ladder to slide down quickly without notice. Always pull the ladder down slowly and cautiously. 

 Relevant Codes
The 2009 edition of the International Building Code (IBC) and the 2006 edition of the International Residential Code (IRC) offer guidelines regarding attic access, although not specifically pull-down ladders. Still, the information might be of some interest to inspectors.

2009 IBC (Commercial Construction):
1209.2 Attic Spaces. An opening not less than 20 inches by 30 inches (559 mm by 762 mm) shall be provided to any attic area having a clear height of over 30 inches (762 mm). A 30-inch (762 mm) minimum clear headroom in the attic space shall be provided at or above the access opening.

2006 IRC (Residential Construction):
R807.1 Attic Access. Buildings with combustible ceiling or roof construction shall have an attic access opening to attic areas that exceed 30 square feet (2.8m squared) and have a vertical height of 30 inches (762 mm) or more. The rough-framed opening shall not be less than 22 inches by 30 inches, and shall be located in a hallway or readily accessible location. A 30-inch (762 mm) minimum unobstructed headroom in the attic space shall be provided at some point above the access opening.

Tips that inspectors can pass on to their clients:
  • Do not allow children to enter the attic through an attic access. The lanyard attached to the attic stairs should be short enough that children cannot reach it. Parents can also lock the attic ladder so that a key or combination is required to access it.
  • If possible, avoid carrying large loads into the attic. While properly installed stairways may safely support an adult man, they might fail if he is carrying, for instance, a bag full of bowling balls. Such trips can be split up to reduce the weight load.
  • Replace an old, rickety wooden ladder with a new one. Newer aluminum models are often lightweight, sturdy and easy to install.
​
In summary, attic pull-down ladders are prone to a number of defects, most of which are due to improper installation.
0 Comments

Sump Pump Operation & Inspection Guide

4/16/2018

0 Comments

 
Sump pumps are self-activating electrical pumps that protect homes from moisture intrusion. They are usually installed below basement or crawlspace floors to remove rising groundwater and surface runoff before it has a chance to seep into the home. Accumulated water can cause interior damage and encourage the growth of mold, mildew, and fungus. Pumps should be maintained and equipped with all necessary components in order to ensure their reliability.
How a Sump Pump Works 

A pit, known as a sump pit or sump trench, can be dug at the lowest part of the basement floor to capture and contain any flowing water. A sump pump sits at the bottom of this trench (or beside it) and expels excess water through a series of interconnected pipes to a suitable discharge location. The pump can sense water levels through a float that rises and falls with fluctuating water levels in the trench. The sump pump becomes activated and deactivated based on the height of the float, providing a simple, automated way to monitor and deal with variable water levels.
Picture
Types of Sump Pumps
  • Pedestal sump pumps sit above the water line beside the sump trench and are not designed to get wet. Since they are not contained within the sump pit, they can be accessed easily but are also very noisy. They cost roughly $60 to $200, which is significantly less than other varieties.
  • Submersible sump pumps rest underwater at the bottom of the sump pit, and are much quieter than pedestal pumps. Their oil-cooled motors and tight seals protect against water and dust and afford them a long lifespan. They can cost up to $600.
  • Water-powered sump pumps are normally used as backups and kick in when the main pump experiences an electrical or mechanical failure.
Maintenance
  • The pump must be kept clean and free of debris. The inlet screen prevents the passage of dirt and other solid material from entering the pump, but it can become overwhelmed. Cleanings should occur often for pumps that run constantly.
  • Inspectors should make sure that the float is not tangled or jammed in one position. A sump pump with a jammed float is useless because it will not sense when it should turn on and shut off.  
Picture
  • The pump can be tested by pouring water into the pit to make sure it becomes activated and expels the water. The homeowner should seek professional assistance if the pump does not activate.
  • Maintenance should take place annually, and when the home is sold.
  • When testing the pump, no one should ever reach into the pit. The float can be reached and manipulated with a household item such as a golf club (with a rubber handle) or anything else non-conductive that happens to be lying around. 

Inspectors should check for the presence of the following:
  • A GFCI. There is considerable debate among inspectors concerning whether or not a sump pump should be connected to a GFCI. It is possible that a GFCI can prevent electrocution, but it is extremely unlikely that a sump pump will energize water in the first place. It is much more likely that a GFCI will trip during safe conditions and deactivate the sump pump when it is needed. A sump pump is among the most critical of all household appliances, and its deactivation, especially if the tenants are not home, could allow catastrophic building damage. Codes recommend that appliances in basements and crawlspaces be connected to GFCIs to reduce the chance of electrical shock, but this advice is often ignored due to these concerns over nuisance tripping.

  • An alarm. Sump pumps can burn out, lose power, become clogged or misaligned, or malfunction in a variety of other ways. It is valuable to have a warning device installed that will signal water build-up. These alarms can alert homeowners or neighbors of flooding so that it can be resolved before water damage occurs. Alarms are especially important in residences that are not occupied for long periods of time. Inspectors should keep in mind that, while an alarm can be helpful, it is not a requirement.
  • a check valve. This device is the same diameter as the discharge pipe into which it fits and is usually a different color. A check valve should be installed in order to prevent pumped water in the discharge line from re-entering the sump pit when the device is turned off. Without this valve, the pump will have to work twice as hard to remove the same column of water, which causes unnecessary strain to the pump components. A check valve can also prevent the rare yet disturbing possibility that a discharge line connected to a stream or pond will back-siphon into the sump pit.
Picture
  • a backup power source. Power outages are most likely to happen during heavy rains and floods, which are situations when the sump pump is most needed. For this reason, combined with the nuisance-tripping from GFCIs, sump pumps should have a backup power source to rely on. A pump powered by a battery or the home’s water pressure can also be installed as a backup. Installation of a backup power source or backup pump is not a requirement, but can be offered to a client as a recommendation.

  • that the pit that is large enough for the pump. The sump pit does not need to be constructed from any particular material, as long as it is solid and provides permanent support for the pump. It must, however, be large enough to allow the pump room to work properly. Some homeowners use a 5-gallon bucket as a sump pit, but this is insufficient. For most homes, the sump pit should not be less than 24 inches deep and 18 inches wide. One of the most common reasons why sump pumps fail is that the float gets jammed between the pump and the pit because the pit is too cramped.

  • a cover. The sump pit should be covered to prevent water from evaporating into the home.

Discharge Location
​

 Insideout inspectors are not required to check for a proper discharge location. They can note an improper discharge if they see it, but searching outdoors for the discharge is not recommended. The following is good general information that can be passed on to the homeowner:
  • Water must be discharged at least 20 feet from the building.
  • Water should not drain back into the house! Cycling water will place unnecessary strain on the pump and can weaken the structure’s foundation.
  • Water should not drain onto a neighbor’s property without their approval.
  • Many jurisdictions do not permit pumped water into public sewer systems.
  • Pumped water should never drain into a residence’s septic system. Especially during heavy rain, a septic drainfield will become saturated and will struggle to handle the normal flow of water from the house. Additional water from the sump pump can damage the septic system. 

In summary, sump pumps are used to remove excess water from homes that would otherwise cause property damage. There are multiple types, but they all monitor water levels and ensure that they do not rise higher than predetermined levels. Proper maintenance and inspection will ensure pump efficiency and prolong their lifespan.
0 Comments

Inspecting Gutters & Downspouts

4/9/2018

0 Comments

 
Picture
InsideOut Home Inspectors are required to inspect the gutters and downspouts as part of the roof portion of the home inspection.  
Some important factors a home inspector should consider include:
  • that the guttering system is adequately sized to prevent runoff;
  • that the gutters are free of rust, cracks and holes in order to prevent leaking; and
  • that the downspouts divert water 4 to 6 feet away from the home's foundation.
           
A few inches of rain falling on the roof of a house can produce several thousand gallons of water runoff. This runoff must be channeled away from the home's foundation. Otherwise, the excess water can quickly saturate the soil surrounding the building and wick through the foundation to the interior. (See Figure 1 below.) Once inside, this moisture can lead to a variety of problems, including mold and wood rot. Excess moisture can also cause indoor air quality problems. 
Picture
Figure 1:  If not drained away from the house, the volume of water coming off a roof in a large rainstorm can quickly saturate the soil and wick through the foundation into the interior of the building.

Gutter System Basics
Gutter systems consist of two parts: 1) gutter channels that run horizontally along the roof edge to collect runoff; and 2) the downspouts that carry the collected water to grade level. Roofing gutters should slope down toward the downspout at the rate of 1/16-inch per foot, or 1/4-inch per 5 to 10 feet. An angle less than this won't allow water to move effectively, and much more of an angle will cause the water to move at too great a speed, potentially resulting in overflow over end caps and corners. 

In terms of standards, InsideOut home inspectors are not required to measure the amount of gutter slope. To do it accurately would be time-consuming, would require a transit or water level, and would exceed InterNACHI's Standards of Practice. A more practical approach is to make sure that all gutters slope toward the downspout. In judging adequate slope, look for signs of standing water in portions of the gutter away from the downspout, and eyeball the margin against the fascia. 
​

Gutter channels are typically available in 4, 5, and 6-inch sizes. They are referred to by their shape: there are K-style gutters (also known as "ogee" because the shape resembles this molding type); and U-style gutters (or half-round), as shown in Figure 2 below. The style differences are principally aesthetic; there is no substantial difference in performance. Larger sizes conduct more water at a faster rate, provided that there are enough downspouts to drain the gutter channels without overflowing.
Picture
Figure 2:  Standard gutter styles found in building supply centers include the K and U styles. The difference is purely aesthetic.  (Image courtesy of the U.S. Dept. of Energy's Building America Solution Center.

Downspout Basics


Most downspouts are made of the same material as the gutter system, so they tend to suffer from similar problems, but with a few twists -- especially in the area of mechanical damage from proximity to high-traffic areas.
Downspouts should be inspected for:
  • the connection between the downspout and the gutter;
  • proper attachment of the downspout to the structure;
  • leakage in joints (sometimes they will have been installed upside-down);
  • impact damage from doors of vehicles parked nearby; and
  • downspouts that terminate onto another roof surface.
Climate

The following are some climate-specific considerations for different types of gutter systems:
  • Hot-Dry and Mixed-Dry Climates:  Gutters are not required in all dry climates. However, a wide roof overhang will keep occasional runoff away from the home.  As with any structure, the grade at the foundaiton should slope away from the building.  Metal, rather than vinyl, gutters and downspouts are safer in areas susceptible to wildfires. 
  • Hot-Humid and Mixed-Humid Climates:  In areas with heavy rainfall, the gutter and rain leader capacity should be increased. Kickout and diverter flashing will prevent high water volume from spilling over the gutters and running down the exterior walls of the home. 
  • Marine Climate:  In areas that experience high winds and heavy rains, the gutter and rain leader capacities should be increased, especially for large roofs. 
  • Cold and Very Cold Climates:  Depending on the building codes for the jurisdiction, it may be wise to avoid the use of gutters in areas that receive high snow loads.  If gutters are installed, ice buildup inside the gutters during freezing and below-freezing temperatures can lead to ice damming, which can cause moisture intrusion through the roof's sheathing and any unsealed openings.  There are products available at building supply stores that will help prevent Ice Dams from forming.

Tips for Homeowners
​

Inspectors can relay the following tips to their clients to help them properly and safely maintain their home's gutter system:
  • Observe common-sense safety precautions (and enlist a spotter, if available) when using a ladder to reach the gutter system.  Always maintain three point contact and don't over-reach; move the ladder instead.
  • If mounting the roof, wear footwear with gripping treads to prevent slipping.
  • Wear gloves to protect hands and arms from sharp debris, as well as from animals and insects that may be hiding in the gutters. 
  • A gutter scoop is a convenient tool for removing leaves and other debris. 
  • Cleaning gutters can take a substanial amount of water. Place a garden hose in the gutters and downspouts to flush them out, making sure that the water is directed away from the home via the downspouts. This will help reduce the chances of saturating the soil around the foundation. 
  • Covered gutter systems may be effective in preventing excessive debris buildup, but these are not maintenance-free.
  • Homeowners can install a rainwater harvesting system (if allowed in their jurisdiction) that includes a drainage mechanism to handle overflow. 

If the home is surrounded by deciduous trees, they may shed their leaves onto the roof and into the gutters. So, home inspectors should impress upon their clients that regular gutter system maintenance is necessary to prevent moisture intrusion problems.  
​
  The home inspector should also explain to his clients the importance of a properly functioning gutter system, and the potential problems that an undersized or damaged system can create.

This article was sourced from the U.S. Department of Energy and InterNACHI®.   
0 Comments

Inspecting Generators & Hazards

4/2/2018

1 Comment

 
Homeowners may use a generator to supply electricity to their home in the case of a power outage, either out of necessity or convenience. Inspectors may want to know about generators and the potential hazards they present when improperly wired or utilized.   
​

Generator Types
There are two main types of generators:  permanently installed, standby generators; and gasoline-powered, portable generators. 
 
Standby Generators 

Standby generators typically operate on natural gas or liquid propane. They remain fixed in place outside the home and are designed to supply on-site power to specified circuits through a home's electrical wiring. These generators work in tandem with a manual or automatic transfer switch, which automatically detects an interruption in grid-powered  electricity and ​subsequently transfers over electrical input to the generator.
 The transfer switch suspends input from the generator once it senses that utility-powered electricity has resumed. Generators for small- to medium-size homes are typically air-cooled and employ fans to regulate the temperature inside the unit. Liquid-cooled units are used for the larger energy loads in larger homes.
Picture
Some advantages of standby generators are as follows:
  • They may be turned on manually, or they may be programmed to switch on automatically in the case of a power outage even when no one is home.
  • Power may be supplied for extended periods of time.
  • Hard-wired systems, such as a home's furnace, well pump and air conditioner, may maintain continuous power.
  • Uninterrupted power can be supplied to systems that must remain on continuously, such as medical equipment used for breathing, etc.
Disadvantages of standby generators are as follows:
  • Installation may require a permit.
  • A qualified technician, such as an electrician, is required to install the ATS and to determine the electrical load requirements for the circuits in a home.
  • Routine maintenance is required.
  • Standby generators may be prohibitively expensive.
Portable Generators 

Gasoline-powered, portable generators are typically smaller in size and power capacity than permanently installed generators. They are designed so that corded electrical devices may be plugged directly into them. 
Picture
Gasoline-powered, portable generators are typically smaller in size and power capacity than permanently installed generators. They are designed so that corded electrical devices may be plugged directly into them. 
 
Advantages to portable generators are as follows:
  • Portable generators are versatile. They may be used at home or transported and utilized in remote locations, such as a campground or a construction site.
  • They do not require complicated installation.
  • They typically do not require permits.
  • Portable units are generally less expensive than standby generators.   
Disadvantages of portable generators:
  • Devices that are hard-wired into a home's electrical system cannot be powered by a portable generator if no transfer switch is installed.     
Hazards
  • Portable and standby generators produce dangerous carbon monoxide (CO) gas, which can be deadly if inhaled.
  • Inexperienced installers are exposed to the risk of electrical shock. Only qualified electricians should attempt to install a generator.
  • Overloading a generator may result in reduced fuel efficiency, damage to appliances or fire.
  • Standby generators or their required transfer switches that are incorrectly wired (or missing) may result in "back-feed" -- a hazardous condition in which an electrical current is fed back into the grid -- which could potentially electrocute and kill homeowners, utility workers, and others who are using the same utility transformer. 
  • Connecting a portable generator directly into a home's wall outlet can also cause dangerous back-feed.
  • Generators that are exposed to water or that are not properly grounded can cause electrocution.
  • Gasoline for portable generators is highly flammable and may cause a fire when exposed to an open flame or when spilled on the hot generator.
  • Over-taxed cords attached to a portable generator may cause a fire.
Inspecting A Generator
​

InsideOut inspectors check for the following: 
  • Generators should never be used anywhere indoors, even if the area is ventilated.
  • Portable generators placed outside should not be near doors, vents or open windows leading into the home.
  • Carbon-monoxide detectors should be installed in case CO is accidentally released into the home.
  • A standby generator hard-wired into a home should have a transfer switch installed to prevent backfeeding.  An inspector can locate this device situated between
  • Generators should be properly grounded.
  • Units should be dry and shielded from contact with liquid.
  • Only heavy-duty electrical cords that are rated for outdoor use should be plugged into portable generators.
  • Electrical cords should not have any punctures or exposed wiring.
  • Cords running from portable generators should be kept out of the way of foot traffic and should not run underneath rugs.
  • The total electrical capacity of the generator should exceed the power requirements of the devices that the unit is supplying.
  • Fuel for portable generators should be stored away from the home and children in clearly labeled and durable containers.

In summary, generators can be lifesavers during a power outage, but they present serious health and safety concerns if they are not installed and used properly. 
1 Comment
<<Previous

    InsideOut Team   

    This blog is to help people better understand their home inspection. It is filled with great in depth advice. If you'd like a topic covered just send us an email on what you need more information on!

    Archives

    November 2020
    October 2020
    March 2020
    November 2018
    April 2018
    March 2018
    February 2018
    January 2018
    December 2017
    November 2017
    October 2017
    September 2017
    July 2017
    May 2017
    April 2017
    March 2017
    February 2017
    January 2017
    April 2014

    Categories

    All
    Appliances
    Home Inspection
    Household Features
    Inspection Reasons

    RSS Feed

    Newsletter Sign Up

Submit

InsideOut
Contact
Information

SE MI: 734.224.0342
N MI:
231-714-6880
OH: 419.215.3856

8314 Whiteford Center Rd
Ottawa Lake, MI 
49267

3154 W Bear Lake Rd NE
Kalkaska, MI
​49646
​
Fax: 
734-224-0241

What We Do

Residential Home Inspections
Commercial Inspections
Radon Testing
Water Quality Testing
Septic/Leach Field Inspections
Sewer Scope Inspections
Well Inspections
Pest Inspections
Structural Inspections
Manufactured Home Certifications
Mold Testing
Infrared Inspections
Home Binder

Social Media

© 2021 InsideoutInspections.net. All Rights Reserved.
  • Home
  • Services
    • Well Inspections
    • Residential Inspection
    • Commercial Inspection
    • Infared/Thermal Imaging
    • Radon Testing
    • Mold Inspections
    • Septic Inspections
    • Pest Inspections
    • Water Quality Testing
    • Structural Inspections
    • Sewer Scope
    • Manufactured Home Certs
    • Home Binder
  • Areas Served
  • Schedule
  • Sample Report
  • Reviews
  • Contact
  • Blog