|
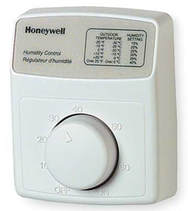
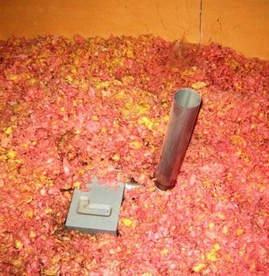
Humidifiers are devices that humidify air so that building occupants are comfortable. Central humidifiers are hard-wired into a house’s plumbing and forced-air heating systems. What is humidity? Humidity refers to the amount of moisture in the air. “Relative humidity” signifies the amount of moisture in the air relative to the maximum amount of water the air can contain before it becomes saturated. This maximum moisture count is related to air temperature in that the hotter the air is, the more moisture it can hold. For instance, if indoor air temperature drops, relative humidity will increase. How do central air humidifiers work? Central air humidifiers are integrated into the forced-air heating system so that they humidify air while it is being heated. The water that is used by the device is pumped automatically into the humidifier from household plumbing, unlike portable humidifiers, which require the user to periodically supply water to the device. Humidifiers are available in various designs, each of which turns liquid water into water vapor, which is then vented into the house at an adjustable rate. Why humidify air? Certain airborne pathogens, such as those that cause the flu, circulate easier in dry air than in moist air. Moist air also seems to soothe irritated, inflamed airways. For someone with a cold and thick nasal secretions, a humidifier can help thin out the secretions and make breathing easier.
Central Humidifier Dangers Humidifiers can cause various diseases. The young, elderly and infirm may be particularly at risk to contamination from airborne pollutants, such as bacteria and fungi. These can grow in humidifiers and get into the air by way of the vapor where it can be breathed in. Some of the more common diseases and pathogens transmitted by humidifiers are:
Other tips that InterNACHI inspectors can pass on to their clients:
In summary, central humidifiers are used to humidify air to make it more comfortable, but they can cause health problems and building damage if they are not properly maintained.
1 Comment
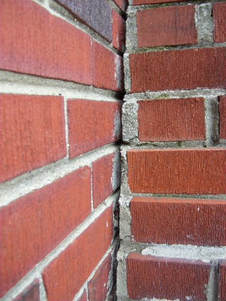
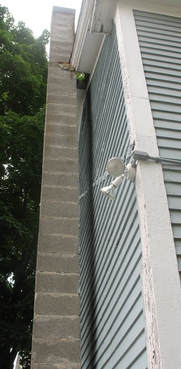
Chimneys are among the heaviest and most structurally vulnerable of all exterior components of a building. Accidents caused by their collapse can lead to death. A collapse can also cause costly structural damage to the building and its surroundings. Inspection, maintenance and preparedness are critical safeguards against chimney collapse.
Chimneys should be inspected for the following defects:
Homeowners should contact their local building departments to obtain required permits before starting any significant construction that may affect the chimney structure and/or its supports.
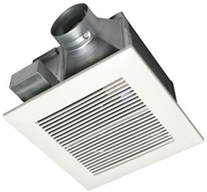
In addition to collapse hazards, leaning chimneys can also make using the fireplace dangerous. Hearth cracks, side cracks in the fireplace, openings around the fireplace, and chimney damage all present the risk that sparks or smoke will enter the living space or building cavities. Check for evidence of fireplace movement. Commercial chimney collapses are rare, but they deserve mention due to the devastation they cause. In one terrible incident in central India, more than 100 workers were killed when a 900-foot (275-meter) tall chimney collapsed on a construction site. One of the worst construction site disasters in recent history, the collapse was blamed on heavy rain. While safety standards are generally more stringent outside of India, commercial chimneys everywhere require inspection. In summary, chimneys should be inspected to prevent deadly, expensive collapses. Bathroom ventilation systems are designed to exhaust odors and moist air to the home's exterior. Typical systems consist of a ceiling fan unit connected to a duct that terminates at the roof. Fan Function The fan may be controlled in one of several ways:
to the fan because of its static charge. Inspectors should comment on dirty fan covers. Ventilation systems should be installed in all bathrooms. This includes bathrooms with windows, since windows will not be opened during the winter in cold climates. Defects The following conditions indicate insufficient bathroom ventilation:
The most common defect related to bathroom ventilation systems is improper termination of the duct. Vents must terminate at the home exterior. The most common improper terminations locations are:
Improperly terminated ventilation systems may appear to work fine from inside the bathroom, so the inspector may have to look in the attic or on the roof. Sometimes, poorly installed ducts will loosen or become disconnected at joints or connections. Ducts that leak or terminate in attics can cause problems from condensation. Warm, moist air will condense on cold attic framing, insulation and other materials. This condition has the potential to cause health and/or decay problems from mold, or damage to building materials, such as drywall. Moisture also reduces the effectiveness of thermal insulation. Mold Perhaps the most serious consequence of an improper ventilation setup is the potential accumulation of mold in attics or crawlspaces. Mold may appear as a fuzzy, thread-like, cobwebby fungus, although it can never be identified with certainty without being lab-tested. Health problems caused by mold are related to high concentrations of spores in indoor air. Spores are like microscopic seeds, released by mold fungi when they reproduce. Every home has mold. Moisture levels of about 20% in materials will cause mold colonies to grow. Inhaling mold spores can cause health problems in those with asthma or allergies, and can cause serious or fatal fungal infections in those with lung disease or compromised immune systems. Mold is impossible to identify visually and must be tested by a lab in order to be confidently labeled. Inspectors should refrain from calling anything “mold” but should refer to anything that appears as mold as a material that “appears to be microbial growth.” Inspectors should include in their report, and in the inspection agreement signed by the client, a disclaimer clearly stating that the General Home Inspection is an inspection for safety and system defects, not a mold inspection. Decay, which is rot, is also caused by fungi. Incipient or early decay cannot be seen. By the time decay becomes visible, affected wood may have lost up to 50% of its strength. In order to grow, mold fungi require the following conditions to be present:
If insufficient levels of any of these requirements exist, all mold growth will stop and fungi will go dormant. Most are difficult to actually kill. Even though mold growth may take place in the attic, mold spores can be sucked into the living areas of a residence by low air pressure. Low air pressure is usually created by the expulsion of household air from exhaust fans in bathrooms, dryers, kitchens and heating equipment.
The following tips are helpful, although not required. Ventilation ducts should:
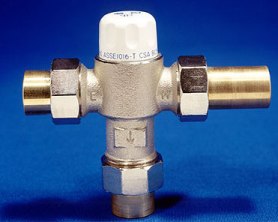
Anti-scald valves, also known as tempering valves and mixing valves, mix cold water in with outgoing hot water so that the hot water that leaves a fixture is not hot enough to scald a person.
Unwanted temperature fluctuations are an annoyance and a safety hazard. When a toilet is flushed, for instance, cold water flows into the toilet’s tank and lowers the pressure in the cold-water pipes. If someone is taking a shower, they will suddenly feel the water become hotter as less cold water is available to the shower valve. By the same principle, the shower water will become colder when someone in the house uses the hot-water faucet. This condition is exacerbated by plumbing that’s clogged, narrow, or installed in showers equipped with low-flow or multiple showerheads. A sudden burst of hot water can cause serious burns, particularly in young children, who have thinner skin than adults. Also, a startling thermal shock – hot or cold – may cause a person to fall in the shower as he or she scrambles on the slippery surface to adjust the water temperature. The elderly and physically challenged are at particular risk.
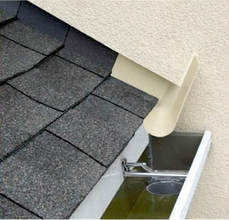
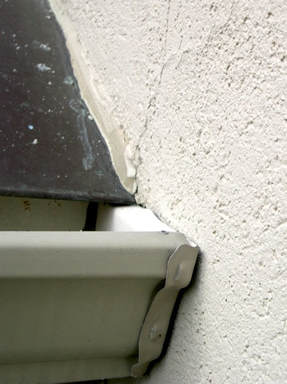
Anti-scald valves mitigate this danger by maintaining water temperature at a safe level, even as pressures fluctuate in water supply lines. They look similar to ordinary shower and tub valves and are equipped with a special diaphragm or piston mechanism that immediately balances the pressure of the hot- and cold-water inputs, limiting one or the other to keep the temperature within a range of several degrees. As a side effect, the use of an anti-scald valve increases the amount of available hot water, as it is drawn more slowly from the water heater. Inspectors and homeowners may want to check with the authority having jurisdiction (AHJ) to see if these safety measures are required in new construction in their area. Installation of anti-scald valves is typically simple and inexpensive. Most models are installed in the hot-water line and require a cold-water feed. They also require a swing check valve on the cold-water feed line to prevent hot water from entering the cold-water system. They may be installed at the water heater to safeguard the plumbing for the whole building, or only at specific fixtures. The actual temperature of the water that comes out of the fixture may be somewhat different than the target temperature set on the anti-scald valve. Such irregularities may be due to long, uninsulated plumbing lines or defects in the valve itself. Users may fine-tune the valve with a rotating mechanism that will allow the water to become hotter or colder, depending on which way it’s turned. Homeowners may contact an InterNACHI inspector or a qualified plumber if they have further questions or concerns. In summary, anti-scald valves are used to reduce water temperature fluctuations that may otherwise inconvenience or harm unsuspecting building occupants. Kickout flashing, also known as diverter flashing, is a special type of flashing that diverts rainwater away from the cladding and into the gutter. When installed properly, they provide excellent protection against the penetration of water into the building envelope.
The kickout was never installed.
The following are locations where kickout flashing is critical:
In summary, kickout flashing should be present and properly installed in order to direct rainwater away from the cladding.
An ice dam is a ridge of ice that forms at the edge of a roof and prevents melting snow from draining. As water backs up behind the dam, it can leak through the roof and cause damage to walls, ceilings, insulation and other areas.
How do ice dams form? Ice dams are formed by an interaction between snow cover, outside temperatures, and heat lost through the roof. Specifically, there must be snow on the roof, warm portions of the upper roof (warmer than 32° F), and cold portions of the lower roof (at freezing or below). Melted snow from the warmer areas will refreeze when it flows down to the colder portions, forming an ice dam. Although the primary contributor to snow melting is heat loss from the building's interior, solar radiation can also provide sufficient heat to melt snow on a roof. For example, in southern Canada, enough sunlight can be transmitted through 6 inches (150 mm) of snow cover on a clear and sunny day to cause melting at the roof's surface even when the outside temperature is 14° F (-10° C), with an attic temperature of 23° F (-5° C). Gutters do not cause ice dams to form, contrary to popular belief. Gutters do, however, help concentrate ice from the dam in a vulnerable area, where parts of the house can peel away under the weight of the ice and come crashing to the ground. Problems Associated with Ice Dams Ice dams are problematic because they force water to leak from the roof into the building envelope. This may lead to:
The winter holidays are a time for celebration, and that means more cooking, home decorating, entertaining, and an increased risk of fire and accidents. InsideOut recommends that you follow these guidelines to help make your holiday season safer and more enjoyable. Holiday Lighting
Decorations
Holiday Entertaining
Trees
Fireplaces
Toys & Ornaments
Children & Pets
Security
InsideOut Inspections Plus would like to wish all of our readers, clients and realtors a safe & joyous holiday season!  Have you ever woken up in the middle of a winter night, shivering under the blankets and able to see your breath? Or have you ever watched the thermostat creep into the upper 80s during a record-setting heat wave, realizing you haven't heard the air conditioner kick on? If so, your heating or cooling system was on the fritz—and (of course), it happened at the worst possible time. 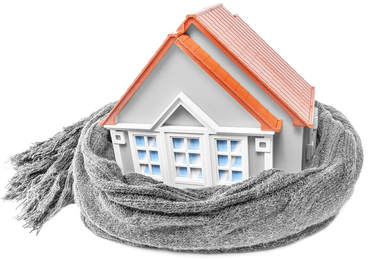 These systems not only fail when you need them the most, but also during the hardest time of the year to get a heating, ventilation and air-conditioning (HVAC) contractor to come by for repairs. Naturally, technicians are at their busiest when these systems are busiest. So, unless you have a relative in the business, the best way to ensure your heating and cooling systems keep working is to maintain them properly. To guard against a future breakdown, have a professional perform periodic maintenance on the systems before the peak seasons begin. Have the heating system serviced in late summer or early fall, and keep in mind that priority scheduling for repeat customers may begin mid-summer. For a central air-conditioning system, arrange to have a pro check it out in the early spring, after temperatures have reached 65° F, depending on when it starts getting hot in your region. A typical maintenance call will involve tightening electrical connections, checking the condition of hoses and belts, lubricating all moving parts, and making sure the controls work properly. For cooling components, the contractor will clean the evaporator coils that remove the heat from the air in your home, as well as the condenser coils that release the collected heat to the outside air. Your tech will also check the fan components, make sure the refrigerant level in the system is correct, inspect ductwork and gas lines, and check for leaks. For heating systems, technicians typically check fuel connections, change the filters, and inspect the system's combustion and heat exchangers. What You Can Do To Keep Your HVAC System Operating!Here are a few maintenance tasks you can perform yourself:
Repair Vs. ReplaceIf your HVAC system does break down, you will be faced with the decision of whether to repair or replace it. Repairs are less expensive, but there are a number of reasons to consider replacing the entire unit.
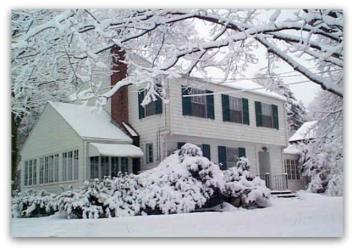
Winterization is the process of preparing a home for the harsh conditions of winter. It is usually performed in the fall before snow and excessive cold have arrived. Winterization protects against damage due to bursting water pipes, and from heat loss due to openings in the building envelope. Inspectors should know how winterization works and be able to pass this information on to their clients
Even during very small ruptures or ruptures that are stopped quickly, water leakage can result in mold and property damage. Broken water pipes can be costly to repair.
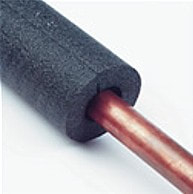
Leaks In The Building EnvelopeLeaky window frames, door frames, and electrical outlets can allow warm air to escape into the outdoors.
Insulation
Cooling System Winterizing
Chimneys & Fireplaces Winterizing
Roof Winterizing
Landscape Winterizing
Adequate winterization is especially crucial for homes that are left unoccupied during the winter. This sometimes happens when homeowners who own multiple properties leave one home vacant for months at a time while they occupy their summer homes. Foreclosed homes are sometimes left unoccupied, as well. The heat may be shut off in vacant homes in order to save money. Such homes must be winterized in order to prevent catastrophic building damage. In addition to the information above, InterNACHI advises the following measures to prepare an unoccupied home for the winter:
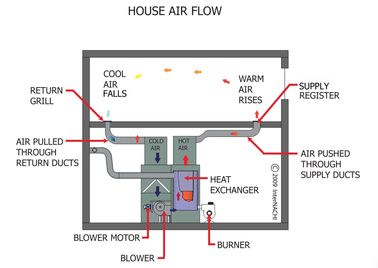
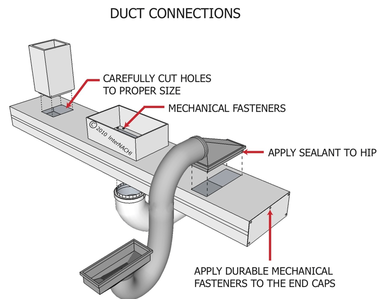
In summary, home winterization is a collection of preventative measures designed to protect homes against damage caused by cold temperatures. These measures should be performed in the fall, before it gets cold enough for damage to occur. Indoor plumbing is probably the most critical area to consider when preparing a home for winter, although other systems should not be ignored. Although inspection of return ducts is not a required step in a professional home inspection, return ducts are a vital component of the HVAC system. Because of this, home inspectors should familiarize themselves with the following key facts and practices in order to perform a superior inspection of the HVAC system. Home inspectors should take note that in order for central forced-air furnace and air conditioning systems to operate properly, the HVAC distribution system should be designed with adequate supply and return registers that provide conditioned air to all parts of the house and return stale air to the furnace for reconditioning. Inadequate return air pathways can cause pressure imbalances from room to room, which can create drafts and temperature differences between rooms or floors, leading to complaints about comfort. Pressure imbalances can also cause the furnace and air-conditioning equipment to work harder than necessary. A well-designed return air strategy is critical for the performance of the HVAC system in an energy-efficient house, which may have lower airflow requirements to meet the lower heating and cooling loads. The return air must have a clear path back to the air handler from every room that has a supply outlet, with the exception of bathrooms or kitchens due to the potential for spreading odors through the house. Each room can be individually ducted to the return side of the air handler; however, installing that much ducting is costly, and there may be space constraints that limit the feasibility of this approach. Utilizing a central return strategy is a simple and effective way to return stale air to the air handler (see Figure 1). When utilizing a central return strategy, one or more return registers should be placed in central hallways or stairwells adjacent to the main living spaces of the house, with at least one return per floor. These central returns should be ducted to the return side of the HVAC air handler, with air-sealed ducts that are insulated if they're located in an unconditioned space (see Figure 2). Building cavities (the space between wall studs or panned floor joists) should not be used as return air pathways; if un-ducted, these spaces are very difficult to air seal. Return air pathways that leak will draw air from unintended places in the house and can lead to undesirable pressure differences. Home inspectors should take note that a fully ducted return system will be easier to air seal and will have better airflow characteristics than building cavities used as return air pathways. To ensure that stale air is able to return to these central returns from rooms that have closeable doors, such as bedrooms or offices, builders will often rely on door undercuts. Typical door undercuts of 1/2- to 3/4-inch by themselves do not allow adequate return volume, especially when carpet is installed, and they're not appropriate for an energy-efficient house. Door undercuts are not approved in the ACCA (Air Conditioning Contractors of America) Manual D. Other methods for providing an air pathway from closed rooms to central return registers are jump ducts and transfer grilles. Return ducts are installed by the HVAC contractor. Return duct locations should be indicated on the HVAC design plans, which is something home inspectors can keep in mind. Tasks associated with this installation should be included in the contract for the appropriate trade, depending on the workflow at a specific job site. How Professionals Install Return Ducts 1. Calculate the amount of return air needed. A target value for return capacity is two times the volume of the total supply air with an airflow velocity within the return of less than 500 feet per minute and the net free area of the grille sized 1.5 times the cross-sectional area of the return duct. ENERGY STAR requires that returns achieve a rater-measured pressure differential of ≤ 3 Pascals (0.012 inch water column) with respect to the main body of the house when bedroom doors are closed and the air handler is operating on the highest design fan speed. A rater-measured pressure differential of ≤5 Pascals (0.020 inch water column) is acceptable for rooms with a design airflow ≥150 cfm. The bedrooms can be pressure-balanced using any combination of transfer grilles, jump ducts, dedicated return ducts, and/or undercut doors. 2. Determine whether to use individual return ducts, one or more central ducts, or central ducts in combination with transfer grills, jump ducts, and/or undercut doors. Consider filter placement when making this decision. With individually ducted returns, the filter will need to be located at the equipment return air inlet. With a centrally located return, the filter can be located at the return grille. This configuration may make it easier for the homeowner to change or clean the furnace filter, if plans called for locating the furnace in a hard to reach location, such as an attic or crawlspace.
Install return ducts as the supply ducts are installed.
Summary
HVAC distribution systems should be designed with adequate supply and return registers to provide conditioned air to all parts of the house and return stale air to the furnace for reconditioning. A well-designed return air strategy is critical for the performance of the HVAC system in an energy-efficient house. Home inspectors can familiarize themselves with these key facts and practices in order to better understand each vital component of an HVAC system. This can help in-progress inspections of HVAC systems, as well as during a home energy score evaluation. |
InsideOut Team
This blog is to help people better understand their home inspection. It is filled with great in depth advice. If you'd like a topic covered just send us an email on what you need more information on! Archives
August 2023
Categories
All
|

 RSS Feed
AboutThe best home & commercial building inspection company in Michigan. Serving Southeast Michigan, Northwest Ohio, Northern Michigan and surrounding areas.
|
Address8314 Whiteford Center Rd Ottawa Lake, MI
49267 1354 W Bear Lake Rd NE Kalkaska, MI 49646 |
ConnectSE Michigan: 734-224-0342
N Michigan : 231-714-6880 NW Ohio: 419-215-3856 Office@insideoutinspectionsplus.net M-F: 7AM - 8:30 PM Saturday: 7AM - 8:30 PM Sunday: 7AM - 8:30 PM |
Social Media |
Resources |
© 2023 InsideoutInspections.net. All Rights Reserved.